Tuesday, August 20, 2013

That Oatmeal Hairband Holder I Keep Seeing On Pinterest...


It's a sad thing, when you feel that you have to hand over the ethernet cord to your husband, as he leaves the house.  Yes.  I've spent waaaay too much time on Pinterest, and have over 11,000 pins during the past year to show for it.  (It's some kind of OCD thing with me.  I get on a theme, and end up scouring for things to go on the board.)

With that said, I did manage to get some things done around the house.  Although I procrastinated a little bit, and worked on this little project instead.

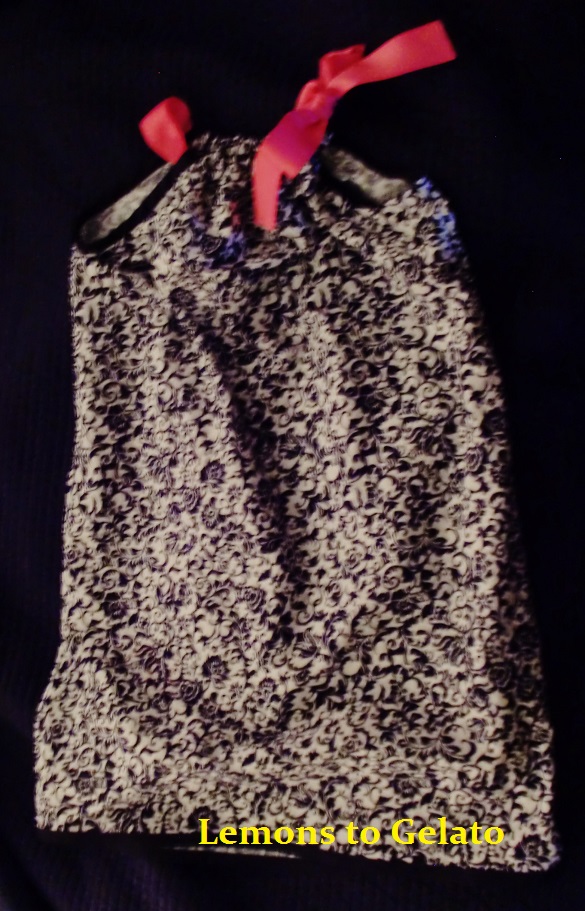
I had some leftover fabric from the pillowcase dress that I made a couple months ago, and thought it would have a nice contrast with the little hairbands laying around.

This project takes about 20 minutes.

You'll need:


  • Quilt batting.  I keep seeing other sites using just fabric or paper just glued to the oatmeal container, but I think the batting gives something for the bands to grab onto, so they won't slide off.
  • The oatmeal container, of course.  (The large-sized container.)
  • Fabric and other decorations.  (I started with the satin ribbon, but it kind of looked warped with the glue, so I ended up using a thicker grosgrain (I believe it's called) ribbon.)
  • Cardboard-- as in the kind that comes from a box.
  • Glue gun
So first off, what you need to do, is cut the batting and glue it to the container.  Keep in mind, that the lid will need to close, so you shouldn't go rogue and tack it over the edge and whatnot, because then the lid won't close.


Next, cut your fabric, making sure you allow between 1/2"-1" extra, to fold under at the bottom.


After that, start gluing the fabric around the container, keeping it taut around the top edge of the container.  (Taut, because you don't want it peeling off whenever the you put the lid on and off.)  


Unfortunately, the leftover fabric that I had, barely wrapped around the box, so I had to improvise.  (See below.)  But you have to realize, it's an oatmeal container, so it doesn't have to be perfect.  (Says the perfectionist in me, that's still having a little problem with this, lol.)


And as you can see, I've had to do a little tack-sewing with this.  At first, I tried gluing the ends of the fabric together, where they met.  But I had to take it off, because the glue gun was leaving too many bumps of glue behind.  

Afterward, I took a strip of leftover fabric, and made a band, to cover that mess.  (Hopefully, you'll have more than enough fabric to not have to do this.  But in the event that you too, either didn't have enough, or mismeasured...)  And if you notice, I am actually using a hair straightener to iron down the edges of this strip.  (So convenient, when you don't want to drag out the iron for something as little as this.) 


So you after you do that, you need to glue the bottom edge on the inside~


To give the bottom a nicer 'tailored' look, cut out a circle from a piece of cardboard.  Cover it with fabric, gluing it to the underside.  Afterward, apply some glue to the bottom of the container, and push the circle in to fit~


Now, to the lid.  Like the pins I've been seeing for this project, I was hoping to just deal with a clear plastic lid.  Nope!  I don't know if it was just cheaper to do that way, or if it was something they decided, based on ecological data.  But the container lid is just a ring with paper in it!  (You might have better luck with a different brand's container.)  But with that said, cut out a circle, and glue it right on top of the Quaker Man's face~


And when you're done, you can add extras-- like the ribbon that I did below.  (Mind you, I could have done more, but I have to realize that it's just an oatmeal container!)


And when you're all done, it looks like this!  


Friday, May 10, 2013

I Think I've Got This Pillowcase Dress Thing Down!


Okay.  Let's get something straight~

I don't sew!

I try to act like I can, but when stitching on bias tape doesn't end up going through onto the other side, I get frustrated.

(Especially when I realize that I set the tension too high, when I'm trying to pull it all out with a seam ripper!)

Being that I haven't sewn anything (other than hemming a pantleg or something) in over 15 years, I wanted my first project to be simple.

As in-- I'm-not-going-to-deal-with-a-pattern kind of simple.

I started looking up these pillowcase dresses that I've been seeing, on Pinterest.  (If you look up the damask ones, you'll find absolutely gorgeous ones!)  

So of course, I ended up getting the fabric and the ribbon, necessary to make one of these things for my 7 year old.


As it has been sitting for the past month and a half, I've been mulling over how to construct one of those things.  (I have a bad habit of jumping into something-- that I know nothing about-- and end up botching it up somehow!)

So today-- in the 85 degree heat (which is uncommon here in Oregon at this time of year), I decided to pull out my sewing machine, and see what I could come up with.

It's just a guide on how to make one.  It takes about 45 minutes to do, because you just cut it out, sew up the sides, add the bias tape, make a hem on the bottom, make a hem on the top, and then roll some ribbon through.

First, I used a pillowcase to trace around two layers of fabric.  Since I don't know about those special pencils that you're supposed to use, I just used chalk~


When you're done tracing, you are left with this~


Cut it out~


Then fold it in half, lengthwise~


On the cut edge, make your armholes.  An easy way to get it right, is use a tea box (or something similar), and round the corners once they're traced~


Unfold it, and you should be left with this~


Reverse it to the wrong side like this~


And then, you're ready to start sewing.  Stitch up the sides and stop when you reach the armholes.  Like I said, I didn't follow a pattern, so use a seam allowance that is comfortable for you~


When you are finished, you have a choice about how you want to do the bottom of the dress.  You can either roll the bottom up twice and make a hem, or you can do it the EASY way, and sew on some bias tape.  The dress below depicts folding it up and making a hem.  (I apologize for the steps getting a little blurry.  I got distracted by my 7 year old wanting lunch, and an old Hazel episode.)~

I measured about 1cm and ironing on the first fold...

...and then folding it up again 2cm.

Start stitching across the end of your hem.  And then you've got the bottom part done~


Next, add your bias tape along the armholes.  (If you don't know how to do bias tape, refer to the post prior to this one-- I'll tell you how to make your own!)


Now, do the same exact thing to the top of the dress that you did at the bottom, leaving the ends open, to slip the ribbon through.  With the unfinished edge at the top, fold and iron about 1cm, and then what I did with this, is fold and stitch another 3cm-- which gives just enough room for the ribbon.

The ribbon can be ran two ways: 1) slip one ribbon through the back, then one through the front, where they will end up being tied into two bows.  2)  run one ribbon through the back, pull it through, and have it run through the front.  Then tie the ends together for a bow that ties on the side.

After that's all done, string your ribbon through, and voila!  You're done!


Mind you, this was just a test run, to see if I could do it or not.  As you can see, I did go a little too short, where it ends up a blouse.  (And the clashing ribbon doesn't help much either.)  But it's easy enough to where I can confidently start on the nicer fabric; knowing what I need to do now!

**Update


I decided to go ahead and use the damask today as well.  (ERG!  It looks like a nightgown!)  So be careful how you measure.  (My mistake was changing my mind from a hem at the bottom, to just adding bias tape-- without making the proper adjustment cuts to it.  Oh well.  It will fit next year!)

***Update

NOW   I've got it down!


How To Make Bias Tape

I am a novice seamstress.  So on a project (that I decided to on a whim today-- because slaving over a sewing machine on an 85 degree day made so much sense), I realized that I needed some bias tape to finish up an armhole.

What is bias tape?  It's not actually tape but more rather a finishing trim, when you don't feel like spending the entire day sewing (and then ripping apart 20 times) fancy techniques for a well-tailored edge.  It works great on armholes, for trim, etc.

It's called bias, because unlike the straight up and down/left to right weave that your fabric has, it is cut on the diagonal.  This diagonal cut, allows it to stretch, and therefore, become workable as you finish your curved edge.


So when you're working on a project, and realize that you need some, what do you do?  You make it from scratch.  

And if you barely have any sewing experience-- like myself, you'll be surprised how easy it is to do.  Honestly, it's not intimidating at all. 

First of all, you get the fabric that you want to make the tape out of.  Since you will be cutting out a strip, folding it in half, and then folding the halves again, make sure it's wide enough for your project.  (For example, a 1 1/2" strip that you cut out, will end up being about 3/8" of an inch when it's finished!)

So with that said, cut out your desired length strip~

I am just totally eyeballing it with a ruler as my guide, but obviously you can measure it and cut it according to how you do your project.  And there's no need to mind the jagged edges, because those are going to be folded inwards and out of sight anyways.

Fold the strip in half, and iron~


After that, fold one half inward, and iron again.  (Do the same for the other side.)~


When you're done, it should look like this~


After that, start sewing it onto your project.  


Word of warning though, make sure that your stitch is also going through the other side of the bias tape!  After I'm done posting this, I'm going to have to go back and rip out the trim from a pillowcase dress that I'm making for my daughter.  (Not fun, since this is the first time I've really sewn anything in over a decade, and didn't realize that there was too much tension on the machine!)

Anyways...

But that is how you make your own bias tape.  Hopefully, the directions are not too confusing!

Happy sewing!


Saturday, April 20, 2013

Interior Design on a Miniature Scale-- and Budget!

Fortunately for me, I've been blessed by a little girl who knows what quality is.  And because of that, she's been able to compare toys of yesterday to toys of today, and come to her own conclusions of what she thinks is worthy of spending her money on.


Underneath my daughter's loft bed, are three shelves acquired from Walmart for $10 each.  And they've virtually become a dollhouse that my daughter has been able to customize to her own liking.

(Personally, I would have LOVED to have it all done up in traditional Barbie colors (pink, black, and white) mixed in with a little damask, etc. patterns.  (Not to mention wanting to go all gung-ho on carving a styrofoam fireplace, with more realistic touches, etc.)  However, who am I to impose on my daughter using her creativity to make something customized to her own tastes?)

With the $30 'dollhouse', comes the fun of choosing wallpaper and tile.  And it's cheap too!  All it takes is a trip to the craft supply store, where you can pick up scrapbooking sheets.  (And compared to the quality of some dollhouses at the toy stores-- it's pretty much the same, if you know what I mean!)

So here are some decorating ideas that my 7 year old has come up with:

Print out tropical landscapes and frame them for windows!

Print out stained glass designs from the internet for wall decor, and
use patterned scrapbook paper to create tiled floors!

Cut up scrapbooking paper and glue on the 'walls' as decorative paneling!

Add ribbon along the walls for a quick chair rail.  Print out
mini posters (like "Keep Calm & Do Laundry") for artwork!

Pinterest holds lots of ideas, such as this one I found for a
queen-sized bed, made from a cereal box and duct tape.  My
kiddo was hoping to have a bed for Mom and Dad Barbie to
sleep in!

Compared to the dollhouses out in toy stores (going for more than $100 each), I think we've done pretty well, coming in at less than $50!    

Use your imagination without breaking the bank.  It makes a fun day when the kids are bored!


Sunday, March 24, 2013

Shabby Chic IKEA Mydal Hack For Under $200


As a parent to two daughters, one thing is for certain-- the youngest ends up with a treasure trove of the older sister's leftovers.  Sometimes, it can be a blessing, or in the event of the parent having to look at the mess-- a curse!

With this being said, it wasn't fun for me, to tell my youngest to go clean up her room, only to be frustrated with not knowing where to put things.  (Not to mention my frustration with having one thing being left on the floor, and looking like a tornado running through it because of that!)

Well, okay.  More than one thing being left behind.  (Note my little one peeking out from the end of her bed.  I would be too if I had a room that could be featured on 'Hoarders'!)


Having a small room isn't the greatest thing in the world, but it's something that can be worked with.

So I ended up going online, trying to find a loft bed.  However, the beds were either just the right size, but $400 too much.  Or just the right price, but made for a room with 12 foot high ceilings.

That's when I went to IKEA, and started looking around.  I've heard of the hacks going on, and I was hoping that I'd be able to find something that wouldn't break the bank-- or my sanity!

I found the IKEA Mydal bunk bed, and tried to envision it without the bottom bunk.  There were just four posts-- rather than the usual 8.  (This makes it sturdier, being that the dowels that usually hold them all together, won't end up splitting apart, when used as a loft bed.)

So for $159, I was sold.  (And I brought the online price in to IKEA, who wanted $179 for it at the store.  I wasn't bound to pay the extra $20 for something that stated $159 on the printed out shopping list they offer online.)

With a husband not feeling so well, I was left with the task of assembling this by myself.  And with a 7 year old around (to occasionally hold one side up, while you're putting it together) it can get done!

And this, is what we ended up with:


And I, by no means, am an expert seamstress.  So there was no way I was going to invest in a ton of fabric only to realize that I was four inches off from the bottom hem, etc.  I was truly fortunate enough to find the curtains at Target for a measely $7.49 each!  (From their Shabby Chic line.)

They are actually balloon shades that I tacked up, and installed on a tension rod.  (The good thing with just tacking them up, is that you can take out the stitch later, and use them for windows later on.)


I still have some work to do on the bed.  As you can see, the ladder needs a bottom rung.   And to make the ladder sturdier, I need to make a run down to Home Depot, to have a full-length post that reaches the floor.


And to keep the tension rod from falling down, I added a plant hook in the middle of the bed, to snap the rod into:


And on top, my kiddo has lots of room to sleep.  (Although, there'd be a lot more, if Grandma would stop adding to the stuffed animal menagerie!  ;)


The fun part, is underneath.  With $30, you can get 3 shelving systems at Walmart that can make a great customized Barbie doll mansion, with room to play!


(If you happen to blow this pic up, nevermind the fish stick box sitting on top of the shelf.  Apparently, this has turned into a Barbie room, after a grocery trip from Costco.  (I was wondering where that box went!)

This project (loft bed and curtains) was just $190.  And it's amazing how long my kiddo has kept her room cleaned!